Enabling Automatic SSL Certificates (ACME) in Your Control Panel
Why am I seeing this?
DirectAdmin recently introduced a new automatic SSL certificate system. If your domain hasn't been switched over yet, you may see a message like:
The ACME system is disabled. Please enable it to manage TLS certificates automatically.
This does not mean your site is insecure right now — it means the new automatic renewal system is simply waiting for you to turn it on and confirm a few settings. Until it's enabled, your certificate will not renew automatically, which can eventually cause your site to show a browser security warning or fail SSL checks.
This guide walks you through enabling it. It takes about a minute.
Step 1: Open ACME Settings
1. Log in to your Control Panel.
2. Go to Account Manager → SSL Certificates.
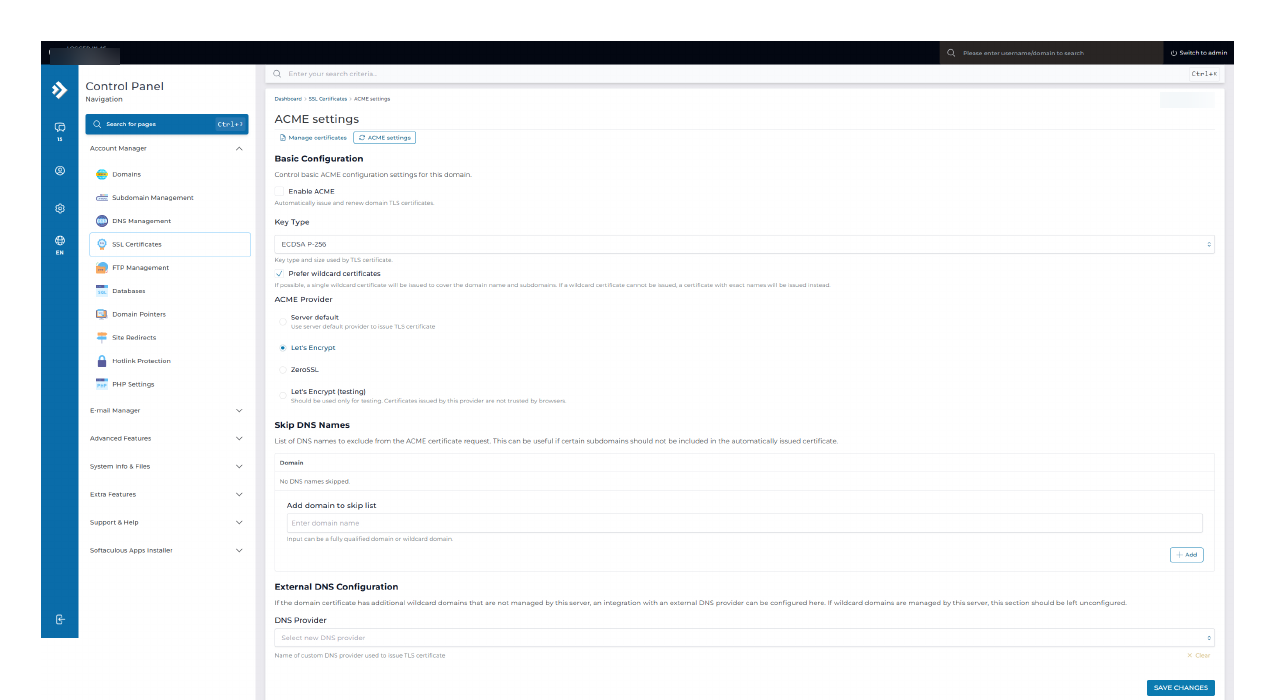
3. Click the ACME settings tab (next to "Manage certificates").
Step 2: Turn on automatic certificates
Under Basic Configuration, check the box labeled Enable ACME.
This tells the server to automatically issue and renew a TLS certificate for your domain going forward, with no further action needed from you once it's set up.
Step 3: Choose your settings
A few options will appear. For most sites, the defaults are fine — but here's what each one means if you want to decide for yourself:
| Setting | What it means |
|---|---|
| Key Type | The cryptographic key type used for your certificate. ECDSA P-256 (the default) is a modern, widely supported choice. Unless you have a specific compatibility requirement, leave this as-is. |
| Prefer wildcard certificates | If enabled, the system will try to issue a single certificate that covers your domain and all its subdomains (e.g. *.yourdomain.com) instead of listing each one individually. Recommended for most accounts — leave this checked. |
| ACME Provider: Server default | Uses whatever provider the server is configured to use by default. |
| ACME Provider: Let's Encrypt | The standard, widely trusted free certificate authority. This is the right choice for almost everyone. |
| ACME Provider: ZeroSSL | An alternative free certificate authority. Only pick this if you have a specific reason to. |
| ACME Provider: Let's Encrypt (testing) | Issues certificates that browsers will not trust. This is only for testing your setup, never for a live site. |
If you're not sure, choose Let's Encrypt.
Step 4: Skip DNS Names (only if needed)
If your domain has subdomains that are not hosted on this server — for example, mail.yourdomain.com, pop.yourdomain.com, or smtp.yourdomain.com if you use an external email provider, or any subdomain pointed at a different host — add them to the Skip DNS Names list.
Names in this list are excluded from the automatic certificate request. If you leave a subdomain in that doesn't actually point to this server, certificate issuance for your domain can fail entirely, so this step matters if you use any external services on a subdomain.
You do not need to do anything here if all your domain's subdomains are hosted on this server.
Step 5: External DNS Configuration (only if applicable)
This section only applies if:
• You use wildcard certificates, and
• Your domain's DNS is managed somewhere this server doesn't control (for example, if you use Cloudflare's DNS in front of your site).
If that applies to you, select your DNS provider from the dropdown and provide the requested credentials so the system can complete the domain verification. If your DNS is managed directly on this server, leave this section blank.
Step 6: Save
Click SAVE CHANGES at the bottom of the page.
Step 7: Issue the certificate
1. Go back to the Manage certificates tab.
2. If your domain doesn't already have a certificate provisioning, click PROVISION NOW.
Your certificate should be issued within a few minutes. After that, it will renew automatically — no further action needed.
Troubleshooting
"Failed HTTP checks" for a subdomain
This means DirectAdmin tried to verify that subdomain but couldn't reach it — usually because it points to a different server, or has no DNS record at all. Add it to the Skip DNS Names list in Step 4 if it's not meant to be hosted here.
Still stuck after following these steps?
Contact support with your domain name and we'll take a look.